Here's the recipe for my mom's fabulous Cranberry-Orange Cream Scones. You can leave out the cranberries and orange flavorings if you'd rather have plain cream scones. Three of my four kids and I prefer them plain, but most people prefer the Cranberry-Orange variety.
Now, don't be scared. Just because they are called "scones" does NOT mean they are difficult to make.
Ready?
Gather your cast of characters and preheat the oven to 425 degrees.

You're going to need:
1/2 c. heavy cream
1/2 c. dried cranberries
1 egg
1 tsp. vanilla
1 tsp. orange extract
1 orange
2 c. flour
1/4 c. sugar
2 t. baking powder
1/8 t. salt
1/2 c. (1 stick) butter - chilled
1 c. powdered sugar
Before you get going, you're going to need these tools, as well:

Before you get going, you're going to need these tools, as well:

That's a pastry cutter, a zester, and my grandmother's one-handled rolling pin. I do not know what happened to the other handle. It still works, though!
And also, this:

It's called a "bench scraper" or "pastry scraper". You can shop for them here.
OK. Let's get started. My stomach is growling.
And also, this:

It's called a "bench scraper" or "pastry scraper". You can shop for them here.
OK. Let's get started. My stomach is growling.
Measure your cream into a small bowl and then add the cranberries. This is going to begin to rehydrate your cranberries. Yum.

Add your egg,

vanilla,

orange extract,

and stir with a fork.

Then, zest your orange. Do you know how to zest an orange? If not, check it out here.
Make sure not to get any of the white pith. It's the bitter part. Zest the whole orange.

That's a fancy zester, Mom!
Now, just push the zest into the bowl.

Then give it a stir.

Set that bowl aside and grab a large mixing bowl.
Measure your flour right into the mixing bowl. (We pre-measured so we would look oh, so professional.)

Then add your sugar,

baking powder,

and salt.

Stir with a fork.

Now, here comes the fun part. Your butter needs to be cold.
Dump the whole stick of butter in. I love to use the word "dump" in recipes.

Check this out ... my mom's little 3-cup measuring cup and her large mixing bowl match. I love that sage green.
Where to find it? woven traditions measuring cup.
You really need a pastry cutter for this step. You can accomplish it using two knives, but you might not ever make these scones again.
Where to find it? woven traditions measuring cup.
You really need a pastry cutter for this step. You can accomplish it using two knives, but you might not ever make these scones again.
Start cutting in your butter. Cut it with the pastry cutter, then turn, and keep cutting.

Keep going till it looks like this - all incorporated. Your butter should be in about pea-sized chunks and covered with flour.

Okay. Add your "wet" ingredients to your "dry" ingredients. See how puffy those cranberries are getting. Like you will get if you make and eat these very often. My kids call it "fluffy".

Stir with a fork.

Keep stirring till it looks like this. It's going to get difficult. Don't get stressed. Just do the best you can.

Now, before you get your hands dirty, reach into your flour container grab a handful. Sprinkle some flour on the surface on which you'll roll out your scones.

Get your hands dirty now.

Start forming it into a ball. Not a perfect ball because you're going to roll it out into a rectangle. More of a loaf shape.
Get all those yummy crumbs out of the bottom of the bowl. Leave nothing behind.

Plop your dough on to your rolling surface. Flour your rolling pin and and start rolling it longways. You don't have to be gentle. These scones are pretty forgiving. And the dough is not at all sticky like biscuit dough.

Roll until you have an oval shape that's about 3/4" thick. Give or take. Remember, it's forgiving.
This is what my dad refers to as "the scone-patty".

If you want, you can cut your scones out with any biscuit cutter or cookie cutter at this point. BUT, if you want them to look like expensive scones (and by "expensive", I mean Starbucks or Corner Bakery), you really need to continue on with the making of the triangles below.
Now grab your pastry scraper and begin pushing the edges of the dough in to form a rectangle.

Now, roll out your rectangle to 3/4" thick again.
Your rectangle needs to be approximately as wide as your scraper and twice as long.
See?


Find the center of the rectangle and press your scraper down to cut it in half.

Now repeat on each of the halves to make quarters.
Now, cut your quarters into triangles.
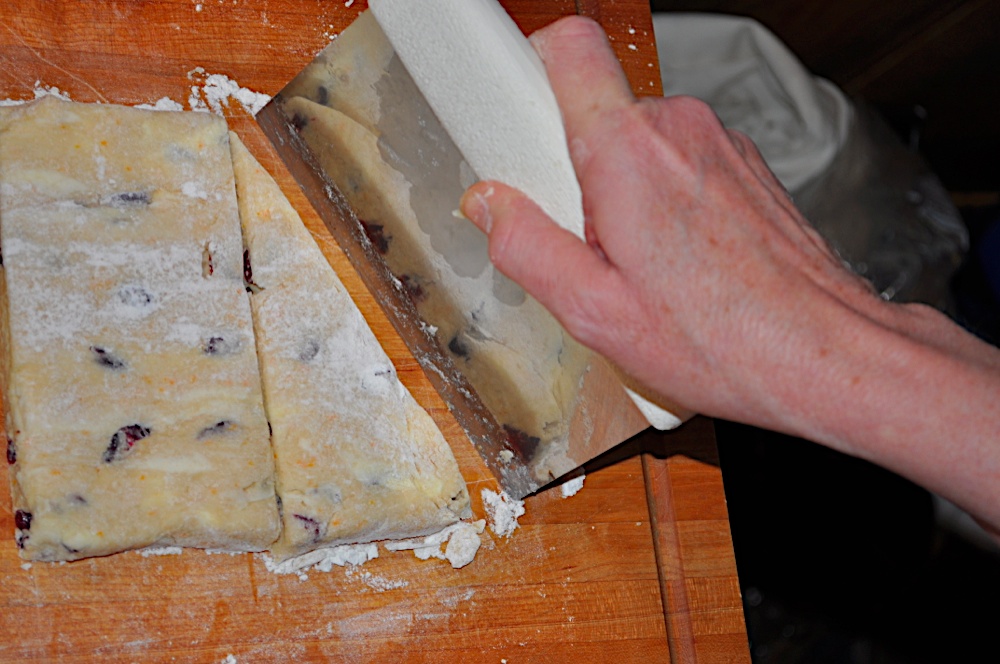
Repeat, until you have eight triangles.

Transfer them, ever so gingerly, on to an ungreased cookie sheet.

Perfect, now into that preheated oven.

Okay, set your timer for 10 minutes and get busy making the glaze.
Grab that ugly orange you zested a few minutes ago. Roll it back and forth on the counter under your hand, pressing down. This will loosen the juices inside.

Oh, look! She washed that cute little sage-green measuring bowl.
Put one cup powdered sugar in the bowl.

Cut the orange in half and squeeze the juice directly into the bowl. Use a strainer if the orange has seeds!!!

Stir, stir, stir.

Don't you think that powdered sugar is magical? You can have a five-gallon bucket full of powdered sugar, add sixteen drops of water, and suddenly, it's a liquid!
When the glaze is the right consistency, it should look like this:

If it doesn't drizzle right off the fork, add a little milk to thin it out. Oops! Too runny? Add more powdered sugar.
Ding ding ding! Time's up!

Arrange those gorgeous scones on a plate - however you like.
We like the pinwheel effect.

Now, go with the glaze.

I just gained five pounds looking at them.
There she is ... with her masterpiece.

And, of course, my dad had to make bacon. For protein. And because no breakfast is complete without bacon.

Also, he gave blood and got a free sweatshirt. He's 57 years old and gave blood for the first time at Christmas. We're all so proud.
Well, there you go. Enjoy!


